Strongspace backups with WinSCP
Downloading and Installing
Here are the things you'll need:
- WinSCP (Nice client for SFTP/SCP. Supports syncronizing folders.)
- You'll need the installer for WinSCP3.com for command line.
- Pageant (Used if you encrypt your private key on your local machine)
- PuttyGen (For key generation)
Copy pageant.exe, and puttygen.exe to a tools directory. Copy WinSCP3.exe and WinSCP3.com to the same directory.
Setting up a key
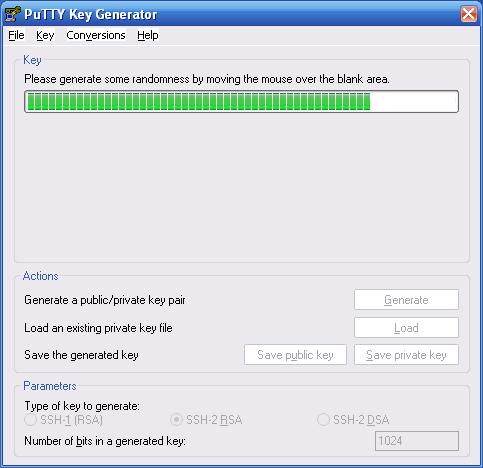
First, you need to generate a key so you won't have to login to Strongspace each time the update runs. Run puttygen.exe to setup your key.
Once it generates a key, you'll want to set the comment (I use username and password of the computer I'm using). And a passphrase. You don't have to set a passphrase if you don't mind your private key sitting unencrypted on your disk. But I think it's a good idea to encrypt the private key. Save the private key to the same directory that you were saving the above apps.
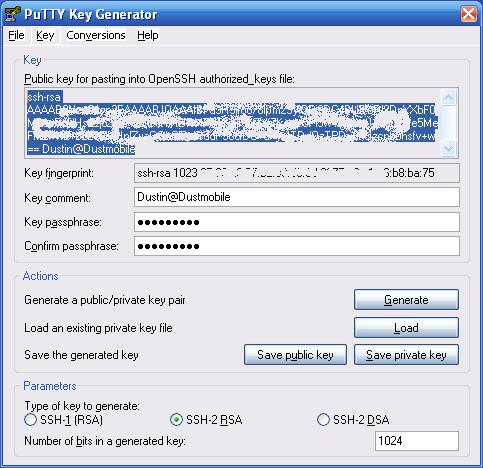
Before closing PuttyGen, log into your Strongspace account and create a .ssh/authorized_keys file and paste the contents of the "Public Key" of PuttyGen as the first line of the file.
Next, you'll need to setup Pageant if you set a passphrase for your key. Pageant will prompt you for your passphrase and then enencrypt your key in memory. Putty and WinSCP3 know how to get the key from Pageant. You'll probably want to start Pageant when the system starts. I created a batch file that contains this line and added it to my startup folder:
c:\strongspace\tools\pagent.exe c:\strongspace\config\strongspace.ppk
Configure WinSCP
Launch WinSCP3.exe to configure your session. Want to set the following information:
- Host name: username.strongspace.com
- User name: username
- Private key file: location of your key
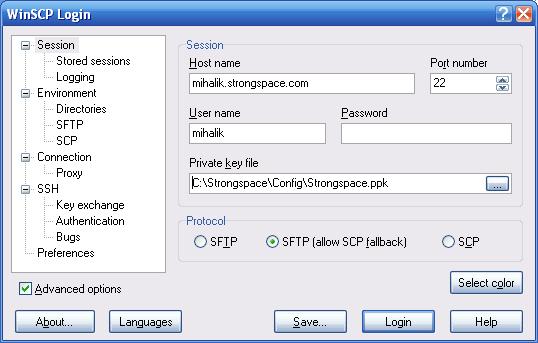
Then hit "Save" and give the session a name like "Strongspace".
Sync script for WinSCP
WinSCP3 has a pretty good scripting environment set up. There's a lot more information in their scripting documentation. I use a really simple script to sync c:\strongspace\shared with a directory called "Shared" in Strongspace.
option batch on option confim off option synchdelete synchronize both c:\Strongspace\Shared Shared exit
Save this script file in the same directory as the above tools and run the following command to start a sync:
winscp3.com /console /script=winscp_script.txt Strongspace
Where "Strongspace" is the name of the session you saved in WinSCP's setup. The important part of this script is the "synchronize both" section. This does the two-way sync.
Automation
You can set this up to run at certain times with Windows Task Scheduler (Control Panel -> Scheduled Tasks). Since my collection of files is fairly static (small utilities)), I created a batch file with the above command and put it on my desktop so I can run the sync any time I know something has changed.